3. Installation and first-time use
This chapter described the installation steps that are required to use the ComFLOW package. The program has been designed to reduce the number of installation steps and on Windows can even be run directly by means of the ComFLOW Command Prompt.
3.1. Installation on Linux
To prepare everything for a first simulation, the following steps have to be taken.
Unzip the ComFLOW deliverables in some installation directory, e.g.
~/comflow.(This step may be skipped if the deliverables were unpacked from a TAR GZ file.) Make sure the ComFLOW executables have executable rights. Go to the subdirectory
bin/linuxand apply the commandchmod +x *to change the flags for all executable files.In order for the system to find the ComFLOW executables the ComFLOW installation needs to be added to the system search path
$PATH. There are two ways to do so:Persistent installation (strongly recommended)
Include the following lines in your log-on script (typically stored in
~/.bashrc)export COMFLOWDIR=~/comflow # <-- main ComFLOW folder . $COMFLOWDIR/bin/linux/comflowsetup.sh # <-- installation script
The environment variable
COMFLOWDIRshould be set to the main folder of the ComFLOW installation (without the trailing/). Do not forget to include the.at the beginning of the second line (‘script sourcing’). The installation scriptcomflowsetup.shtakes care of all the initialization steps.Non-persistent installation
It is also possible to invoke the installation script manually after system startup in a similar manner as described above. However, the installation will only persist in the console in which the installation script was run. The step needs to be repeated upon system restart or change of console.
Select the ComFLOW version to be used. Open a console and run the installation script
setcomflowversion.sh, which is located in the subdirectorybin/linux. A menu is presented with the different ComFLOW versions available in the current distribution.After having selected the ComFLOW version, symbolic links
comflowandgeodef, are automatically created pointing at the corresponding executable versions.
3.2. Installation on Windows
The Windows version of ComFLOW can be used without installation by means of the ComFLOW command prompt.
To get started, unzip the ComFLOW deliverables in the desired installation directory, e.g. in C:\Program Files\ComFLOW.
The ComFLOW command prompt comflowprompt.bat is located in the subdirectory
bin/win64. It is recommended to create a shortcut and for example place it
in the Start Menu or Desktop folder.
A Visual Basic script is provided to generate a shortcut to the ComFLOW command prompt (double click the file bin\win64\createshortcuts.vbs in the Windows Explorer).
By default the ComFLOW command prompt opens in the subdirectory with example simulations examples (or similar).
This behavior can be changed by modifying the ‘Working directory’ property of the shortcut.
During the first run of the ComFLOW command prompt, a default ComFLOW distribution is selected which is available via the commands comflow and geodef.
In order to change the selected version type the command setcomflowversion and follow the instructions on the screen.
Note
- If you want the ComFLOW executables to be available system-wide without intervention of the ComFLOW command prompt, ask your system administrator to place the desired ComFLOW executables on the system search path.
- In order to use the XMF module via the ComFLOW command prompt, no extra steps have to be taken. For system-wide installation it is necessary to set several environment variables in a similar fashion as in the code of
comflowprompt.bat. Ask your system administrator.
3.3. Installing the pre- & post-processor
After having unpacked the ComFLOW deliverables the MATLAB pre- & post-processor is located in the subdirectory matlab.
In order to install the ComFLOW-MATLAB application perform the following steps:
Start matlab.
Open (or create) the MATLAB user start-up script by typing
edit startup.m. This file should be placed on the user path (typeuserpathin the command window to see where).Copy and paste (add) the contents of the file
cmf_startup_template.mto the startup script opened in step 2a.To set (or change) the version, run the MATLAB script
cmf_select_this_version.m. This file is located in the directorymatlab/postpr.NB: Do not move this script to any other location because this may undo the installation.
Restart MATLAB.
The ComFLOW pre- & post-processor can now be opened by typing comflow in the MATLAB command window.
A separate manual is provided for the use of this program.
3.4. Performing a test run
In the subdirectory examples a set of small-sized simulations is included for testing and illustration purposes.
To see if the ComFLOW package is installed correctly, try to run one of the example simulations:
- open a console (Linux) or the ComFLOW command prompt (Windows)
- change to the sub-directory
examples - then change directory to the example of choice
- most of the examples can be run by subsequently typing
geodef,comflow(several examples require additional steps which are explained in the relevant sections of the manual) or by using theruncomflowPython script.
To see if the MATLAB pre- & post-processor is installed correctly, after having run a simulation try to display a snapshot or monitor file.
3.5. The different parts of ComFLOW
3.5.1. The pre-processor GEODEF
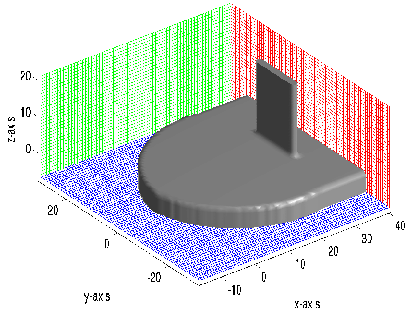
The pre-processor GEODEF should be run first. After running GEODEF (which should take no more than a minute), the resulting geometry and the grid can be plotted using the ComFLOW pre-processor in MATLAB. The result of the example case is shown in Fig. 3.1.
3.5.2. The pre-processor WAVE51
Note
The WAVE51 functionality has been replaced by a new shared-library/DLL-based approach that does no longer require pre-processing. More details can be found in Section 25.2.1.
3.5.3. The flow solver ComFLOW
Now everything is prepared for the first run of the flow solver
ComFLOW.
The input files needed by ComFLOW are apertures.in (which is produced by GEODEF) and comflow.in. The first results can
already be visualized during the simulation, see the next section.